

Generic System Development Process for Small Free Time Projects
Foreword
If you have a really small free time project, you may not need any documented requirements, feature list, architecture description or implementation documentation at all and simply start implementing until everything is how you like it. Depending on your knowledge and ability to order everything in your mind, it may take significantly more time though. You also won't have any documentation about the scope of the project and the implemented solution at the end. As an alternative, you could document everything after the implementation, but this is not likely in practice. So if you plan to have a descent documentation for your product, you may better start documenting from the beginning.
The following requirements and development process is for small free time projects with only some hundred requirements and an implementation effort of let's say 100 person days at maximum. You can execute it using a spreadsheet software. It doesn't cover any project management aspects needed for managing teams or organizations, ressources, costs or any of the other topics needed for professional commercial projects.
If you have a larger project, you could add additional elements and working steps. Reading about requirements management or software development processes in general is recommended in this case. It gives you an idea of what you may need additionally.
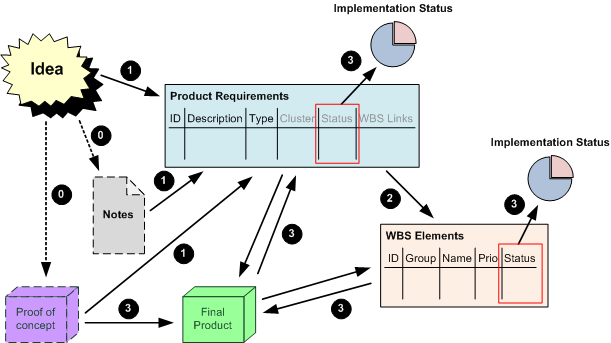
Process Overview
Phase 0: Write Notes and Build a Proof of Concept
This optional phase is especially useful if you are not sure about a concept or the exact use case of your product. Write down some notes (your can use later as requirements) and implement the most critical parts of your product to make sure these will not become the reason to cancel the project when you already have spent much time for it.
For example, if you care about the dimensions, build a mock up from paperboard. If some electronic component is complicated to control, build a small test circuit and implement the driver to communicate to it. If you don't know how you want to interact as a user with the device or software, make some drawings on a piece of paper. (More about Proof of concepts.)
Phase 1: Write down Product Requirements
Write down all the requirements of the product (device / software) from a user / customer perspective. Write them down as separate items which each describe a single logical aspect. They mostly describe the needed functionality of the product. Include the insights from building the proof of concept if you did so. Think as if you describe the product for another person who will implement it without any communication to you until it's finished and who will implement the wrong functionality if you described it wrong. So be very precise, don't forget anything, but also don't describe things that are not necessary. I recommend breaking down the product into separate parts / main functions / use cases / steps and thinking about what has to be fulfilled for each of these. Be sure not to prematurely define how something is implemented if it could also be left open. Beware that if you describe or mention specific elements of the product to build, you imply that you require the solution to comply with it.
If you want very good requirements, read more about the generic characteristics of requirements.
Each requirement should at least have the following attributes:
- An ID (consisting of a common prefix and a number).
- A description of the requirement itself.
- A type, which tells if the item is a requirement to be implemented or something else like headings, information that add some context for better understanding etc..
- Some clustering information which tells in which part of the project the requirement has the most impact.
- An implementation status which tells how far the development is done. I recommend at least to distinguish between "open", "implemented" and "verified".
The last two are added by the person who implements the product and are not part of the initial requirements.
Optionally, you can have comments, tags marking requirements to be considered in a specific area, test criteria which have to be fulfilled at the end or whatever you may find useful.
Phase 2: Create a Work Breakdown Structure
To get a better top level overview about the scope of your project and the progress of implementation, group the requirements by writing down a corresponding list of high level elements to implement (AKA Work Breakdown Structure, WBS). Link them to the requirements by mentioning the IDs of the requirements at each elements or vice versa to make sure that everything is covered. I suggest to mostly think about the functionality of the product and to create feature groups containing single features to be implemented. A hierarchy of more than two levels or different levels per area can't be handled so easy, so use two levels only. Don't stick too much to the term "feature". You may also mention higher level work packages or parts to build up. The list simply shall group everything into bigger elements to get a better overview.
WBS elements should have at least the following attributes:
- An ID (consisting of a common prefix and a number).
- A (feature) group to cluster elements of the same area.
- A name (heading).
- Some prioritization which tells you in which order the elements are planned to be implemented. This can either be a priority number per feature, or a target date (if you are planning against a given deadline) or you can simply place all elements in the order of the planned implementation.
- An implementation status which tells how far the development is done. I recommend at least to distinguish between "open", "implemented" and "verified".
Optionally, you can add a description (most times not needed, because you can read the requirements directly for better understanding), comments or tags as needed.
Phase 3: Implementation and Tracking
Now start implementing your project, beginning with the WBS elements of the highest priority. Read the linked requirements while doing so. When a WBS element is implemented, mark it so in its status.
If you're done with all WBS elements and the product seems mostly finished, verify all WBS elements and set the WBS element status "verified" if testing was successful. Otherwise, implement the missing parts or fix the existing bugs until everything works as planned. As the requirements are more fine grained than the WBS elements, you also have to verify every requirement. Use the requirements status to mark which requirement is verified and which one is not finished yet.
If you want, you can calculate the current degree of completion or a progress over time out of the status attributes of your requirements and WBS elements.
Additions
If the approach is not enough for your project, you should add some kind of functional specifications document and / or architecture documentation.
A functional specification describes how you plan to implement the project / device to deliver the requested functionality of the (customer) requirements of phase 1. They can be described as additional elements with IDs and description and are placed between (customer) requirements and WBS elements.
Architecture documentation can show technical decisions about the implementation in a suitable form (UML diagrams, block diagrams etc.). You can link them to your WBS elements or your technical requirements for traceability.
The Absolute Minimum
If even the steps above are too much for your small project, one could ask what the most important element would be. I suggest having at least a flat list of WBS elements with a status as a rough description of the project scope and as an overview about the implementation status.
Scope Changes & Incremental Approach
If the scope of the product is not clear at the beginning (even if you built a proof of concept) or you have to change the requirements later for another reason, you can change the requirements and WBS elements as needed as the simplest solution. Beware that you do this consistently and e.g. reset the implementation status of requirements and WBS elements accordingly. It is recommended at least to make baselines of requirements and WBS when changing anything. That means you make a versioned copy of them somehow to make it possible to later detect what changed and when.
A better approach would be to write down the changes as change requests in a separate list and linking them to the updated requirements after baselining everything.
You may also write down requirements and WBS while implementing the product by purpose, if you're not clear about what you want. To limit the chaos, I recommend to do this only in the early phase when implementing your "extended" proof-of-concept, and then start writing down a complete and clean set of requirements and WBS before further working on the implementation.
Last Words
I know that this is a very simple approach compared to what's typically done in the professional world and lacks many things. I tried to describe the absolute minimum to do from my point of view when starting any such requirements and project management activities at all. If you have any suggestions to this approach, feel free to contact me. It would be nice to hear about your personal opinion.